Partial Approval Testing
Integration: EiServer
Note: The following setting is required for Swipe or Hand-Key transactions processed through the USAePay gateway:
easyIntegrator1.ConfigFields.AllowPartialApprovals = True
Requirements
To support Partial Approval and Split Payments, ensure the following system requirements are met:
Operating System
- Windows 10 Fall Creators Update (Version 1709) or later
- Windows Server, Version 1709 or later
.NET Framework
- Version 4.8 or later
- How to determine installed .NET Framework versions
EI Server
Device Compatibility
- Clover Flex
- PAX: Version v1.04.08E or later
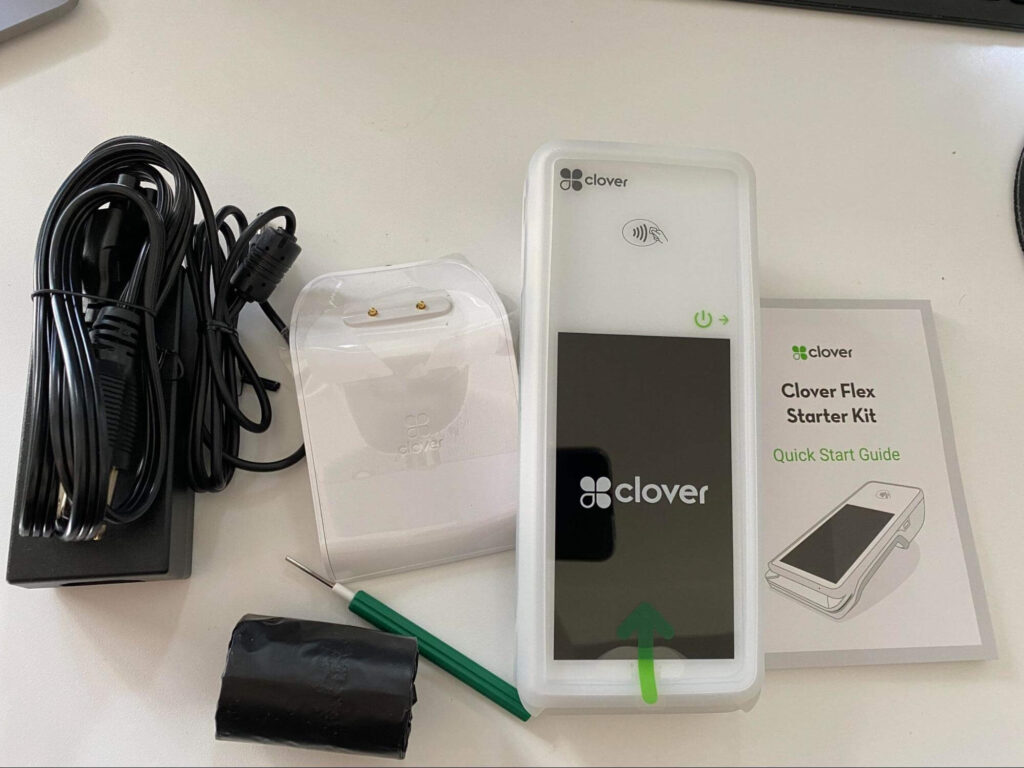
Clover Flex Terminal
General Notes
- EI Server Compatibility: Requires EI Server version 5.3.4.2 or later.
- RDP Use: If a merchant is using Remote Desktop Protocol (RDP), the host server must be on the same network as client workstations. USB connections and COM port forwarding are not supported with the Clover Flex. Only Windows Server 2016 and Windows Server 2019 are supported.
- Device Pairing: Devices should be dedicated to individual workstations. Each workstation processing transactions with Clover Flex must have its own paired device.
- Network Support:
- WiFi: Supported natively.
- Ethernet: Requires a separate adapter for hard-wired connections if desired.
- Device Updates: Clover manages all OS and app updates. We have no control over the timing of these updates, as the device typically checks for updates at least once every 24 hours.
Tipping: Currently, Tip-on-Terminal is the only supported tipping method. Future EI Server releases will support tip adjustments post-transaction.
Box Contents
- Charging base
- Power adapter
- Screwdriver (for attaching Ethernet adapter and other accessories, sold separately)
- Receipt paper
- Quick start guide
PAX A35 Terminal
General Notes
- EI Server Compatibility: Requires EI Server version 5.3.26.6 or newer.
- RDP Cable: The PAX A35 includes its own RDP cable and does not require a separate RDP kit.
- Network Connectivity:
- Supports both Ethernet and WiFi connections.
- Note: Network configuration details are not preloaded in the build from the PAX Store.
- Device Access: The password for accessing the settings app on the device is
pax9876@@.
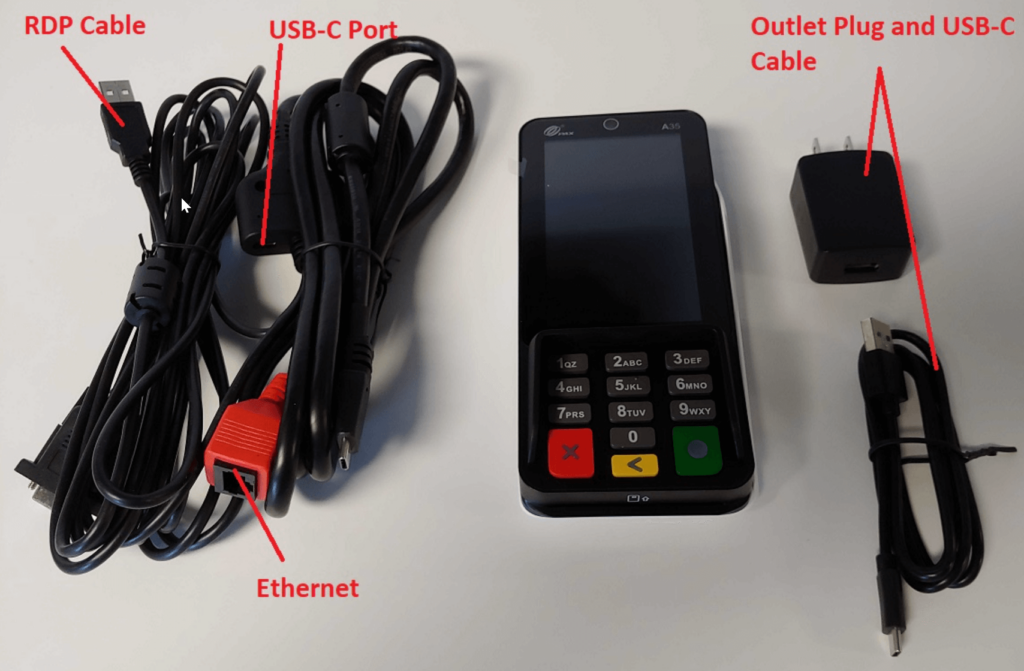
Box Contents
- A35 Terminal
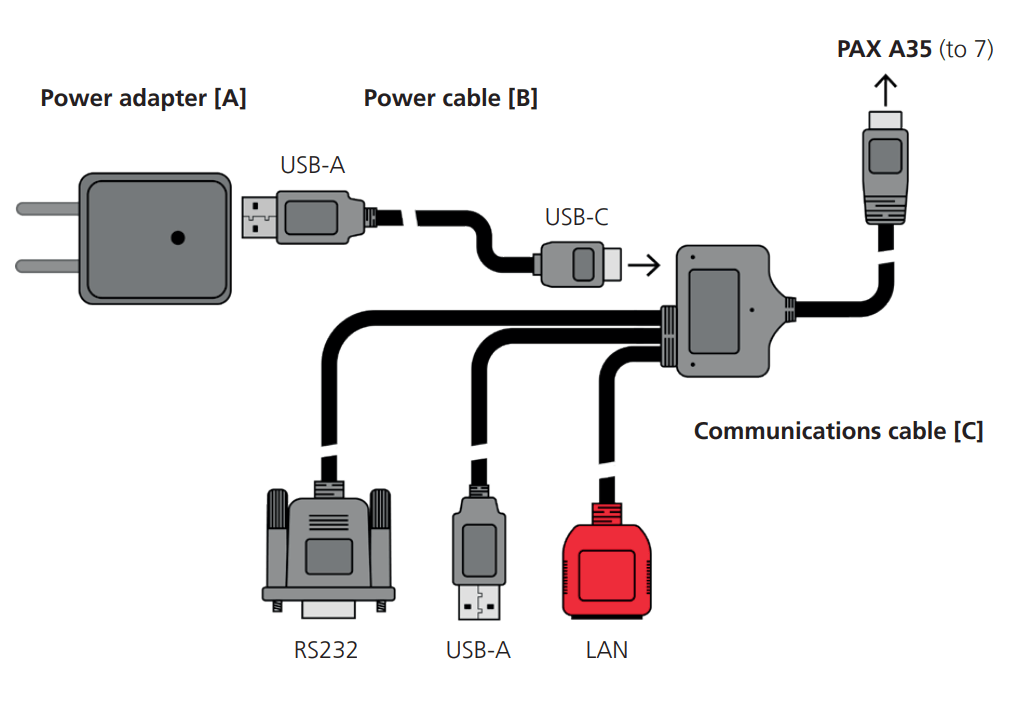
- Dongle with Ethernet and RDP USB attachment
- USB-C to USB power cable
- Power adapter (USB to power outlet)
Step 1: Power On the PAX A35
- Ensure the dongle is connected to the PAX A35. (This should already be done during deployment.)
- Connect the USB-C power cable to the USB-C port on the dongle to power on the device.
- Note: The A35 does not have a power button, similar to the S300 model.
- The A35 should power up automatically and display the home screen with a list of apps.
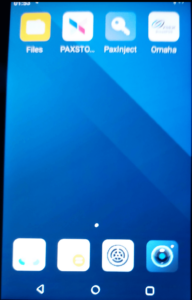
Step 2: Exiting the Omaha BroadPOS Menu
Upon receiving the PAX A35, you may see the Omaha BroadPOS app screen, which might open by default. You must exit this screen to access and configure the network settings.
Note: Tapping the triangle icon will not exit the app.
To exit the Omaha BroadPOS app:
- Tap the icon located in the top-right corner of the screen.
- Enter the password, which is the last 4 digits of the device serial number.
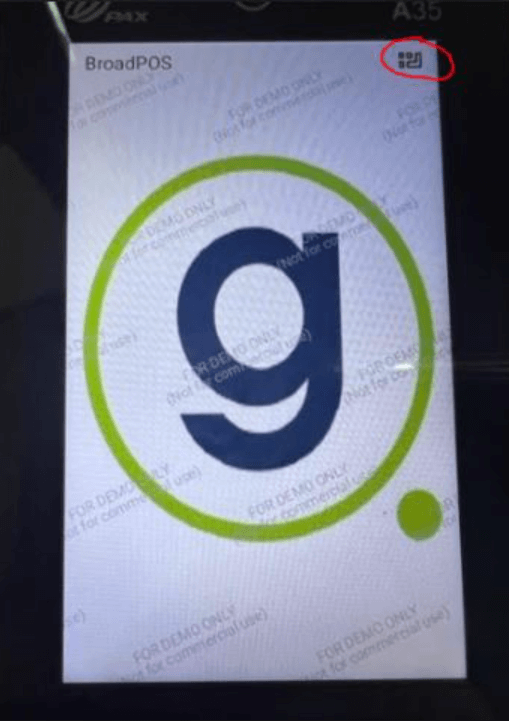
- Scroll down and tap EXIT.
- Re-enter the password when prompted.
Note: The top-right icon may be finicky and may require multiple taps to respond.
Step 3: Configure Network Settings
- Set the device to use a static IP by tapping on the Settings app.
- Enter the password
pax9876@@, then press the green circle key at the bottom right.- Alternate Password:
9876
- Alternate Password:
- Select Ethernet or WiFi, depending on the device’s internet connection.
Ethernet Configuration
- The screen should display the network settings obtained when the device powered on.
- Troubleshooting: If the network information is blank or displays only zeros, reboot the device and verify all cables are properly connected. Ensure the Ethernet cable is plugged into the red Ethernet jack on the PAX A35 cable.
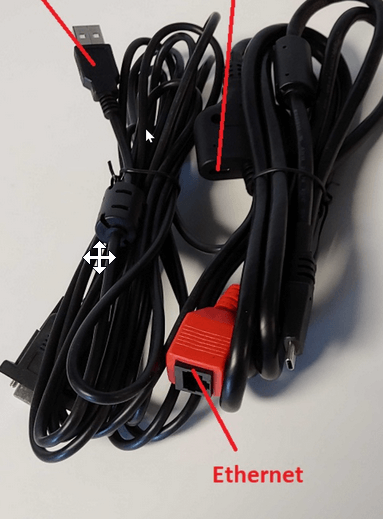
- Scroll down to locate Ethernet Configuration. Tap on it to change the connection type to Static. A static IP address is required, as this will be used later for EI Server configuration.
- IP Selection: Choose an IP address that is not already assigned to another device and is outside the DHCP pool range to prevent conflicts. Note the IP address for later use in EI Server setup.
- Configure the network information as needed. This replaces network settings that would normally be set up in Broad POS. Use the down arrow at the bottom of the screen to close the keyboard.
- Once all settings are complete, tap Save in the bottom-right corner.
- After saving, you will be returned to the Ethernet/WiFi page where the updated network information should now be visible.
WiFi Configuration
- Tap on the currently connected network to open its settings menu.
- Tap the pencil icon in the top-right corner to access network settings.
- Select Advanced Options.
- Scroll down to IP Settings.
- IP Selection: Choose a high-range IP address that is not in use by another device, just as you would with any other networked device. Note this IP address for later use in EI Server setup.
- Change the IP setting from DHCP to Static.
- Update network information as needed. Confirm that you have selected a high-range IP address not currently in use. Record this IP address, as it will be required for EI Server configuration.
- Tap Save to apply your settings.
Returning to the Main Screen
- Once the network information is configured, tap the circle at the bottom of the screen to return to the main menu, similar to any Android device.
Step 4: Verify Internet Connection
- Open the PAXSTORE app to confirm that it launches and connects properly.
- If you encounter any errors, the device may not be connected to the internet.
- Check the internet connection and, if necessary, repeat Step 3 to review the PAX A35 network settings
Step 5: Initialize Device
- Open the Omaha PAX BroadPOS app and confirm that it initializes. The Gravity logo should display once the app is open.
Note: The Omaha app can function if left open or in the background. However, it’s highly recommended to leave the app open, as the device is primarily used for credit card transactions. Leaving it open reduces the chance of the app not opening automatically when a transaction is prompted. - Once initialized, the device is ready for use.

Step 6: Configure EI Server
Note: Ensure EI Server is updated to version 5.3.26.6 or later. Download the latest version here: Gravity Payments Developer Downloads.
- Processor Configuration
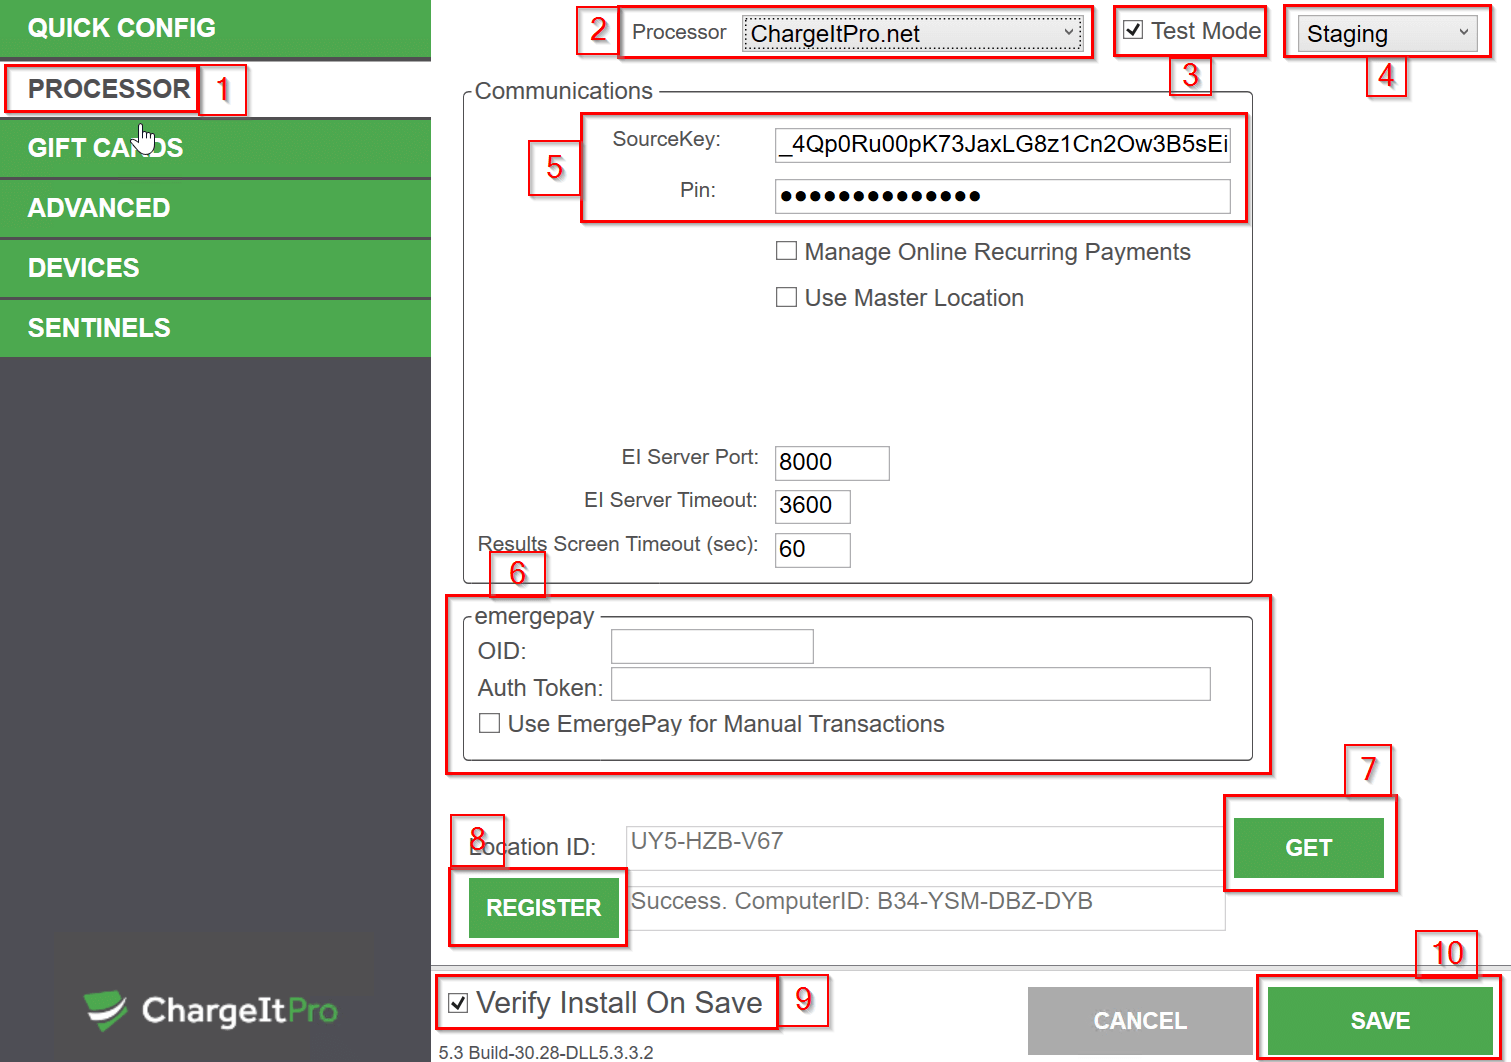
- Click on Processor.
- Select ChargeItPro.net.
- Enable Test Mode and select Staging.
- Enter the password:
chargeitPro1. - Input your Sandbox Source Key and PIN.
- If you do not have this information, contact Developer Support at developersupport@gravitypayments.com.
- EmergePay Configuration (Optional):
- If using EmergePay, enter your AuthToken and OID.
- Select Use EmergePay for Manual Transactions.
- Finalize Setup:
- Click GET.
- Click REGISTER.
- Enable Verify Install On Save.
- Click SAVE to complete the configuration.
- Device Configuration
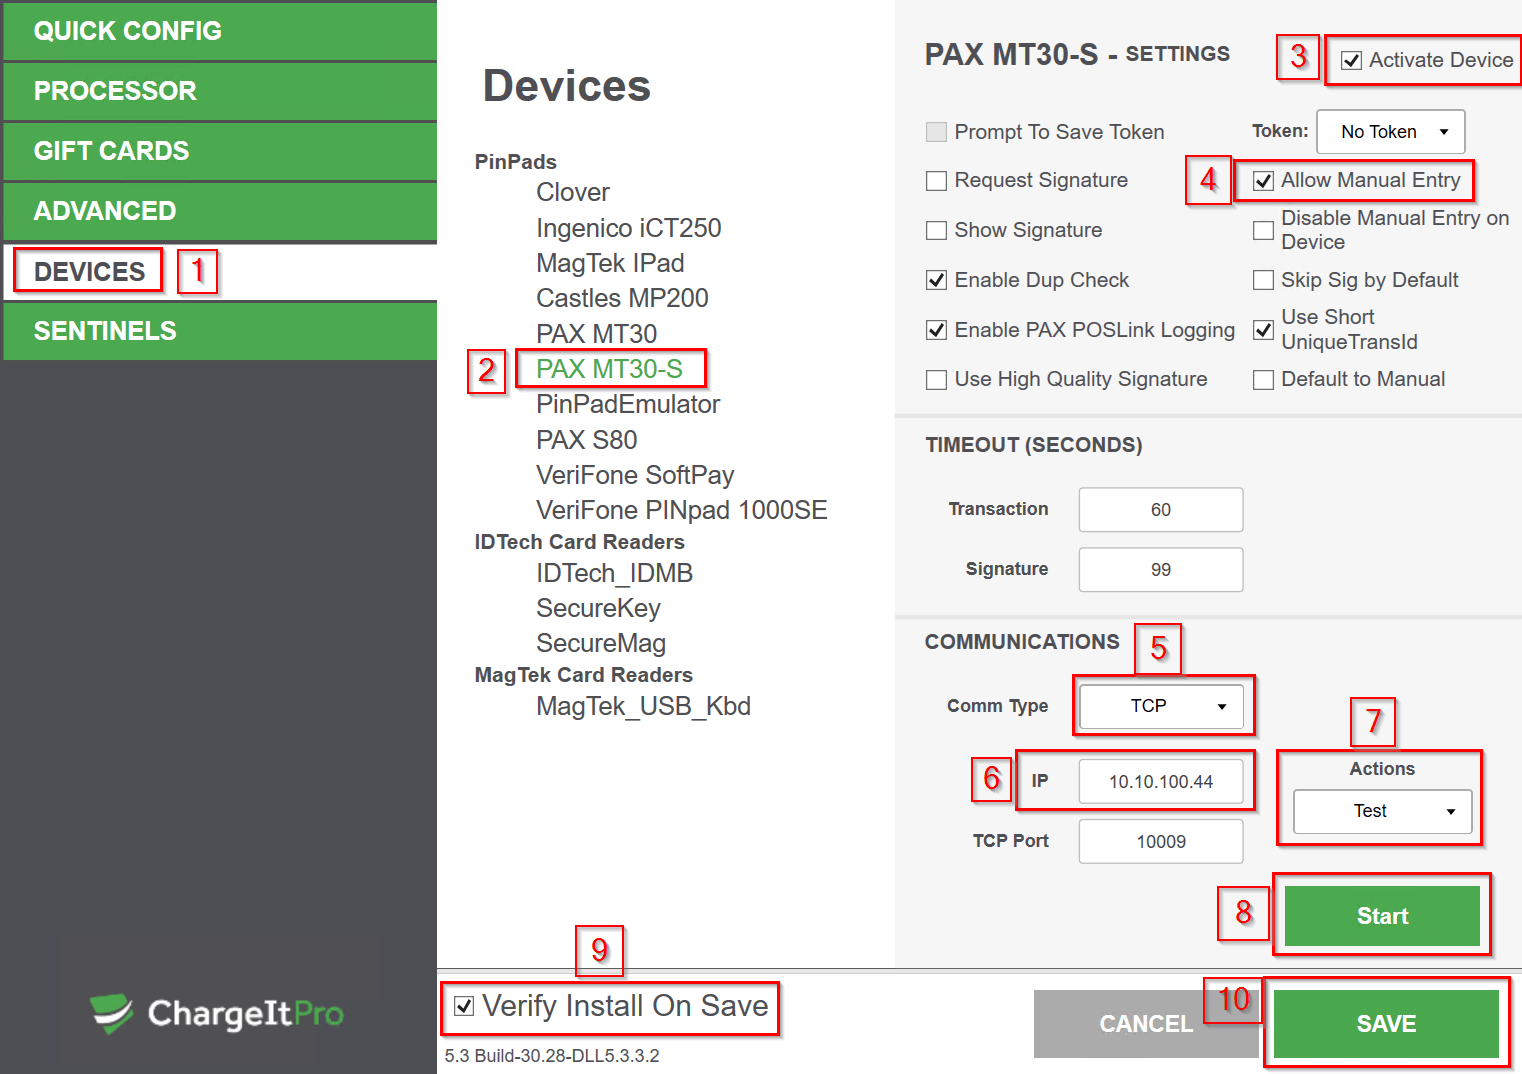
- Click on Devices.
- Select PAX MT30-S.
- Enable Activate Device.
- Enable Allow Manual Entry.
- Set Comm Type to TCP.
- Enter the IP Address from Step 3.
- Set Actions to Test.
- Click Start.
Finalize Device Settings:
- Enable Verify Install On Save.
- Click Save to complete the configuration.
Step 7: Run a Test Transaction
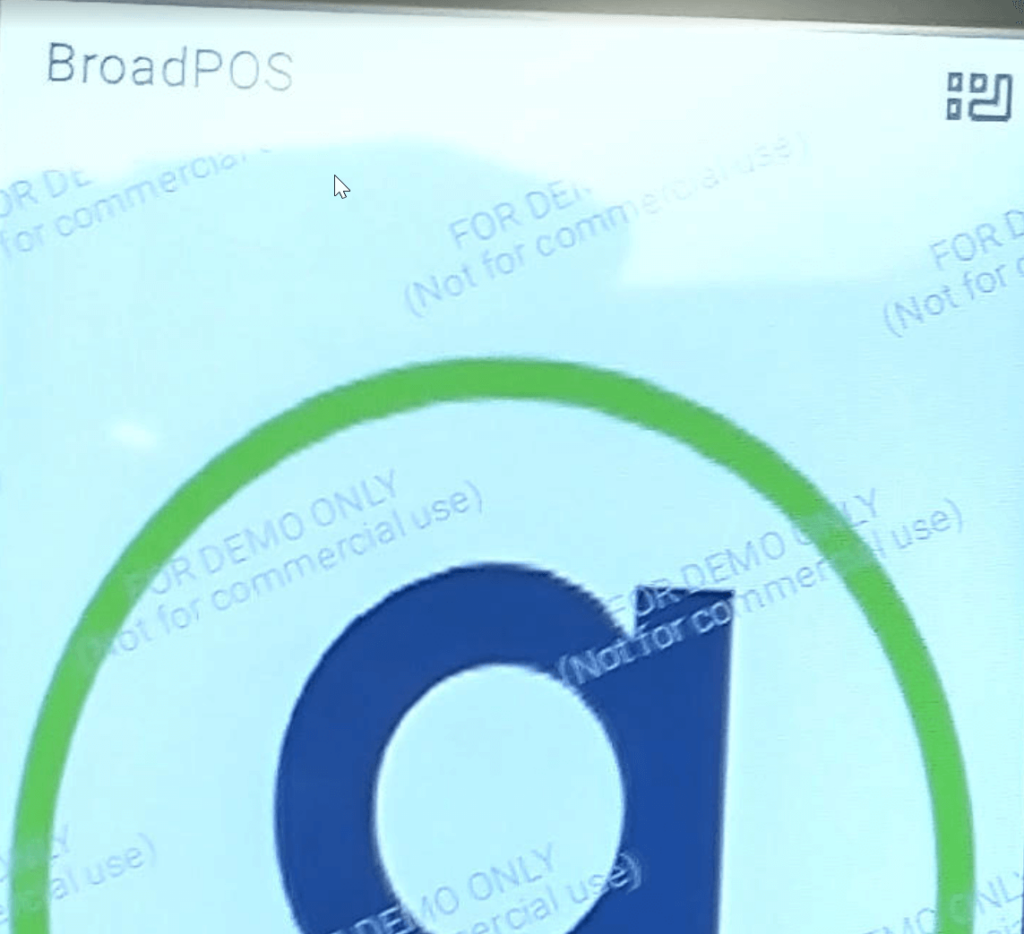
IMPORTANT: Ensure the PAX A35 is in Demo Mode before proceeding.
- Open the BroadPOS app on the device.
| FOR DEMO ONLY
(Not for commercial use) |
- If the device is not in Demo Mode, stop here and contact Developer Support before continuing:
- If your device is in Demo Mode, proceed with running a test transaction.
USAePay Test Card Numbers:
Use the test card numbers provided here for the transaction: USAePay Test Cards & Error Responses
Step 8: Test Partial Approvals
- Run a transaction and compare the following values to verify partial approval:
- AmountTotal Requested: easyIntegrator.transFields.AmountTotal
- AmountProcessed Approved: easyIntegrator.ResultsFields.AmountProcessed
- If AmountProcessed is less than AmountTotal, the transaction was partially approved.
PAX Devices
Note: Ensure the PAX device is in Demo Mode.
- Use any test card number that returns an approval with one of the following amounts to trigger a partial approval response on PAX terminals:
- $30.01: Results in a partial approval for $10.00.
- $30.02: Results in a partial approval for $5.00.

Example:
- A transaction for $30.01 will display a partial approval for $10.
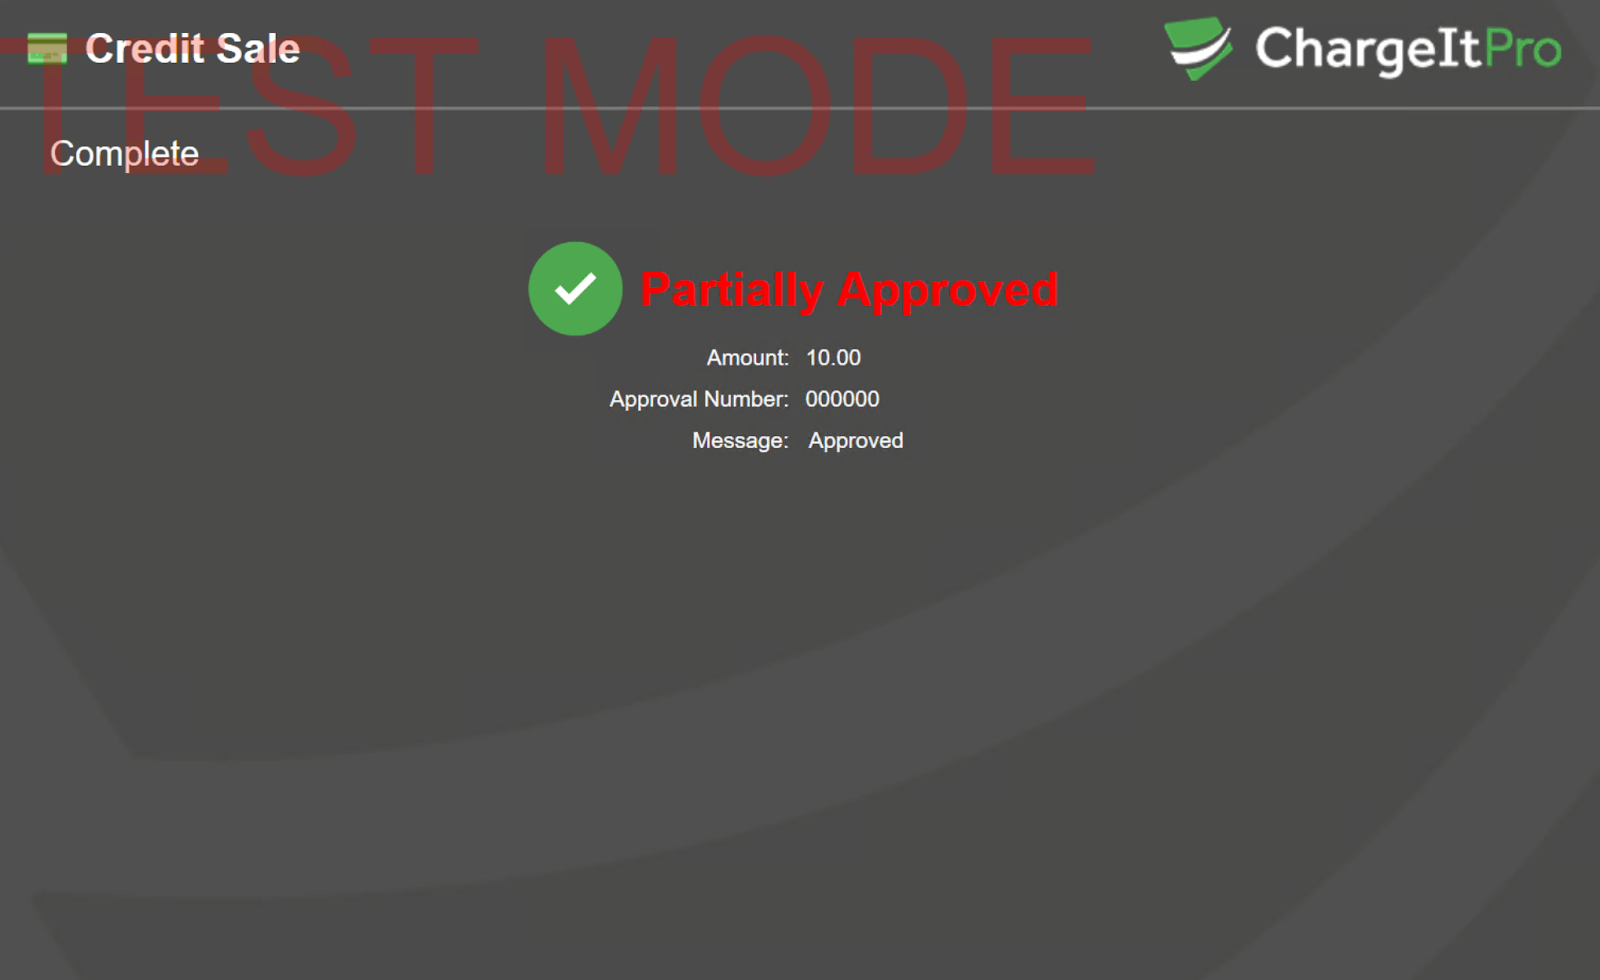
- Similarly, a transaction for $30.02 will display a partial approval for $5.
Final Step: Complete Testing and Schedule Review
- Once testing is complete, contact Developer Support to schedule a review:
Note: No actions are required in the PAX Store when connecting a device. All necessary updates and configurations have been completed by the Deployment team prior to shipping. If an app or firmware update is needed, please contact support for assistance. For detailed instructions, refer to: How To: PAXStore – Add and Activate an Integrated PAX Device for EI Server.
For any additional questions, reach out to Developer Support:
Integration: Emergepay - Clover Flex Terminal
General Notes
- Upon receiving the Clover Dev Kit, a member of the IP team will assist in pairing the device with the Clover Sandbox and adding it to the Gravity Dashboard Sandbox for testing.
- To initiate this setup, send an email to developersupport@gravitypayments.com with the following information:
- Sandbox OID where the Clover should be registered.
- Device Serial Number (located on a sticker under the receipt paper roll).
- Note: Do not send the serial number from the charging base; only provide the actual device serial number.
- Alternatively, you can provide this information via Slack if a channel has been set up with Developer Support.
Box Contents
- Charging base
- Power adapter
- Screwdriver (for attaching Ethernet adapter and additional accessories, sold separately)
- Receipt paper
- Quick start guide

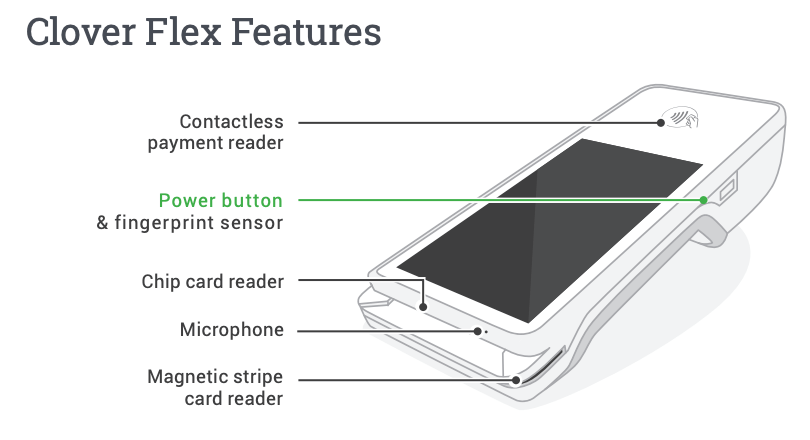
Clover Flex Terminal Setup
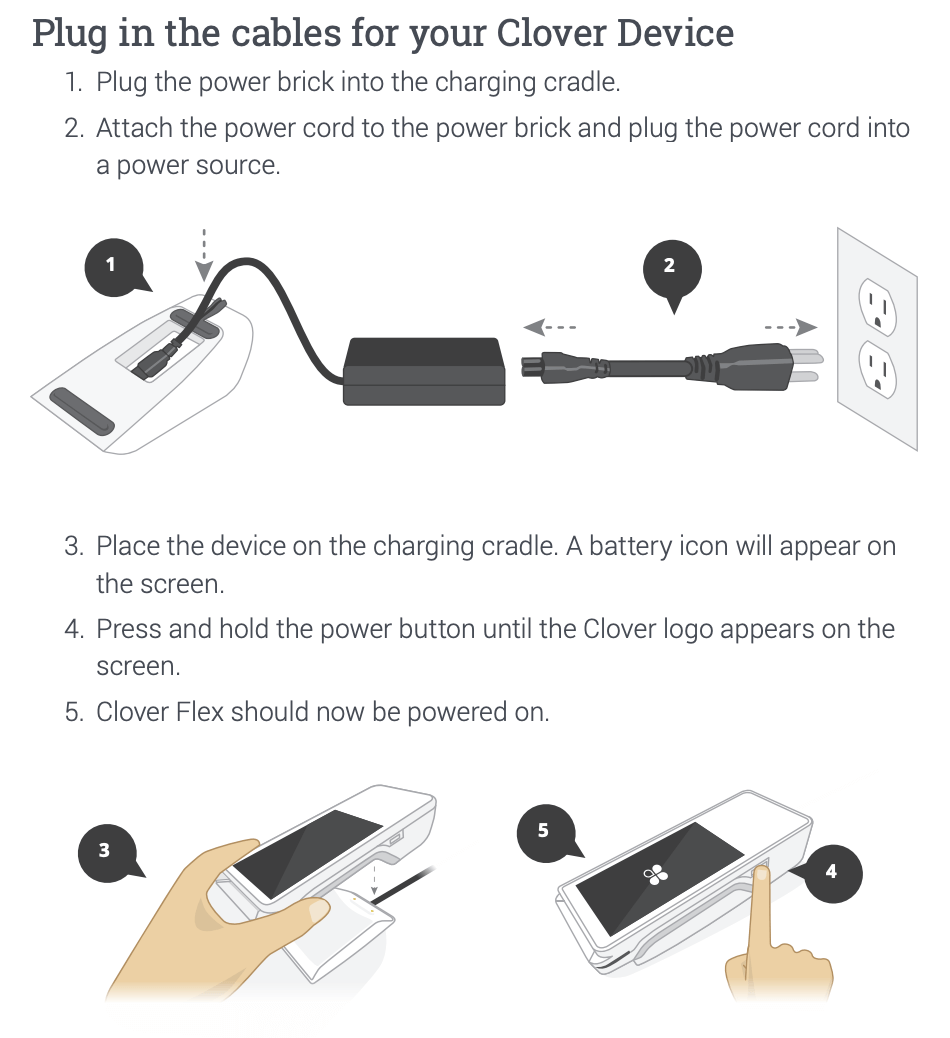
Step 1: Power on the Clover Flex Terminal
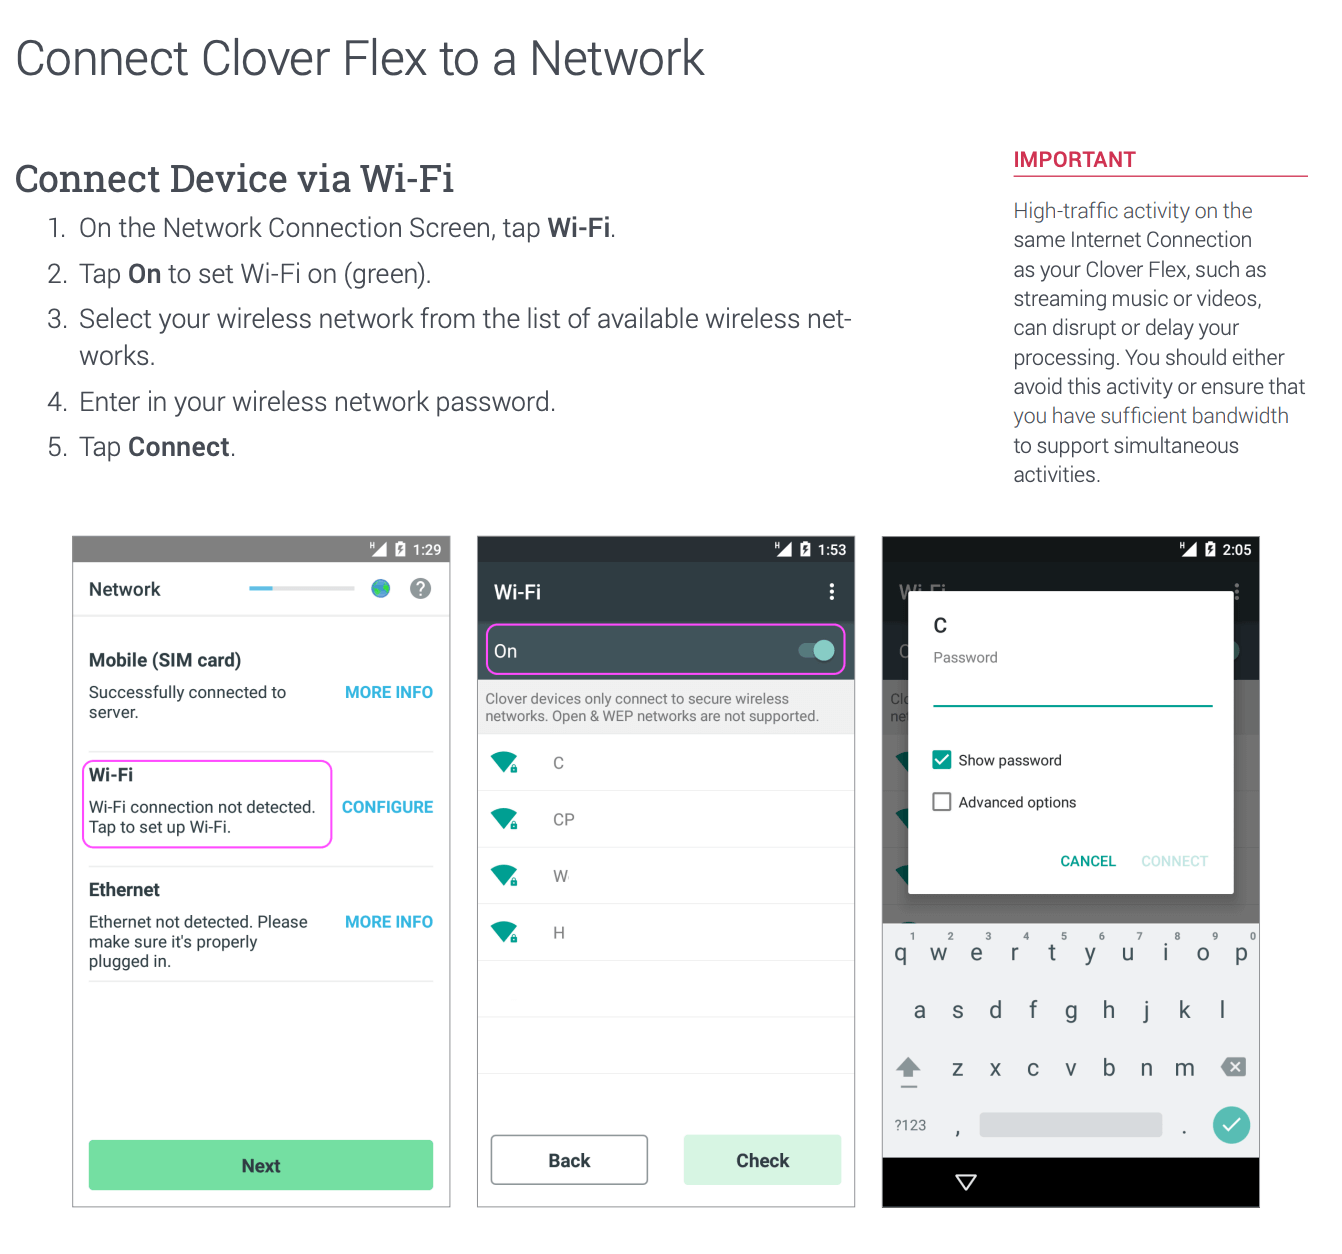
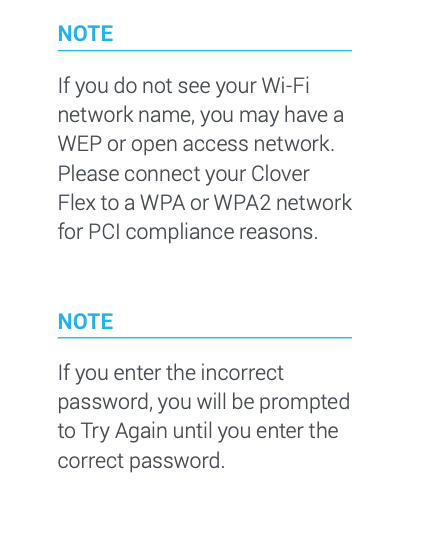
Step 2: Configure Network Settings
-
WiFi: Connect the device to the appropriate WiFi network.
Step 3: Activate Device
- Once the network configuration is complete, contact your IP Specialist via:
- developersupport@gravitypayments.com
- OR your dedicated Slack channel (if one has been set up).
- The IP Specialist will provide you with the activation code once the Clover device is added to the sandbox accounts.
Step 4: Install the CloudPay Display App
- Swipe to the second page of apps to confirm that the Signature app and CloudPay Display app are installed.
- If these apps are missing:
- Tap the More Tools icon to access the App Market and search for these apps to download.
- OR notify your IP Specialist, who can assist in pushing the apps to the device.
Note: If prompted for a passcode, try 1234 for a 4-digit code or 123456 for a 6-digit code.
Step 5: Run a Test Transaction
- For a straightforward test, use the Modal Sale setup to complete a transaction.
- Alternatively, you can use the HostedFields device control, though Modal Sale is recommended for a better user experience.
- Follow the test transaction steps, including sample JSON (provide these details as needed).
Step 6: Test Partial Approvals
-
Use the provided Clover test cards to validate partial approvals.
Final Step: Schedule Review
After completing all tests, contact Developer Support to schedule a review:

